
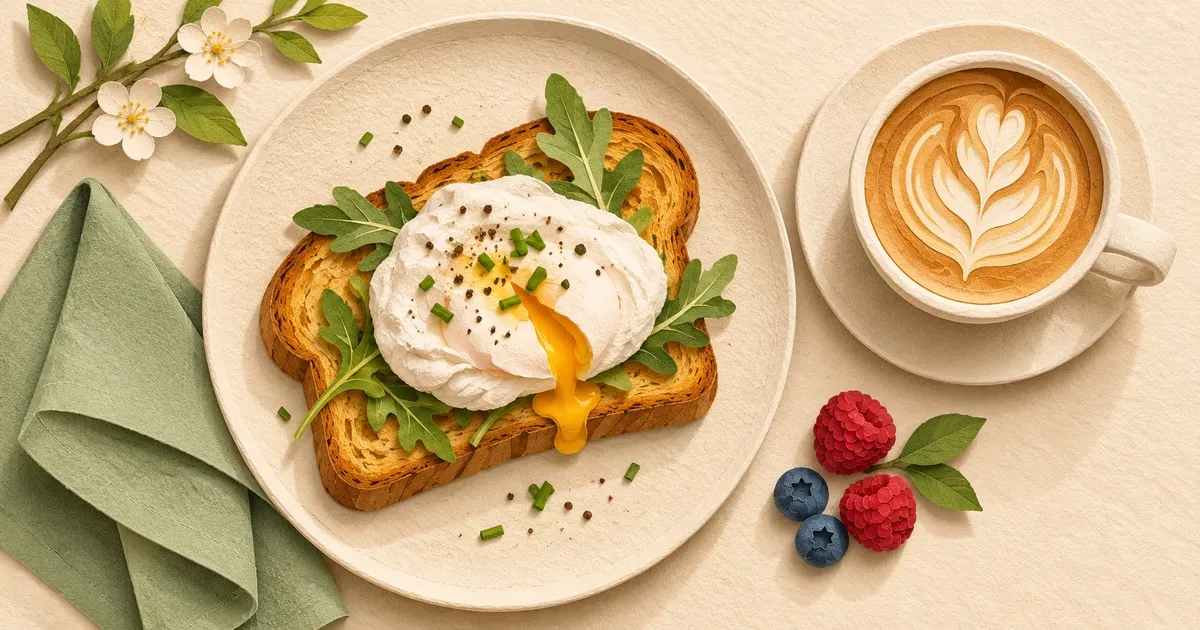
Your breakfast picture looks good horizontally: toast and egg on one side, coffee on the other. Switch to a vertical crop and the coffee disappears. Moving the crop toward the cup cuts through the plate instead.
For a free image-to-video project, solve that framing problem before uploading. Here is a repeatable way to keep the complete picture, prepare two matching portrait inputs, and request a small push-in.
There is an example for you. The cropping, background treatment, and frame preparation were performed externally. No café shoot or successful generated video is claimed.
1. See what a plain vertical crop removes
Open the wide picture in your image editor and try a centred 9:16 crop without applying it.
Our working image is 1600×900 pixels. A 9:16 crop using the full 900-pixel height is only about 506 pixels wide. Its centre runs from roughly x = 547 to x = 1053.
That narrow window cannot contain both this plate and the separate cup. The guide below shows the actual retained area; the darker sides are the parts a centre crop would throw away.

Name what must remain visible before making a different layout. For this example, that means the complete plate rim, toast, egg, cup handle, and saucer. A food blogger may choose different priorities, but do not discover a missing product detail after generating the video.
2. Make a portrait canvas and fit the whole picture
Use an image editor with layers, numeric sizing, alignment, and export controls.
Create a new canvas 900 pixels wide by 1600 pixels high. Add the landscape image as a layer, keeping its proportions linked. Set its width to 820 pixels, then align it to the horizontal and vertical centre.
The picture is now about 461 pixels high. Its left edge is 40 pixels from the canvas edge; its top is about 569 pixels down. All of the wide composition stays visible.
This creates a portrait layout containing a smaller landscape picture. It leaves substantial space above and below. If the food must fill almost the entire vertical screen, consider making a new vertical photograph instead; fitting this complete wide arrangement necessarily makes it smaller.
3. Fill the extra space honestly
You can leave a plain background colour. For the softer version shown here:
- Duplicate the original image and put that copy underneath the sharp picture layer.
- Enlarge the lower copy until it covers the portrait canvas; a centre crop is fine for this background copy.
- Apply a Gaussian blur of 40 pixels at this canvas size.
- Add a warm cream colour layer above the blurred copy at 82% opacity, keeping both beneath the sharp picture.
These settings produce a quiet background derived from the source's colours. The top and bottom are not newly photographed tabletop or AI-expanded scenery. The clear picture remains the reference for the breakfast.

Keep the background layers fixed. They should support the layout rather than compete with the food. The prepared canvas on the right retains the original composition; the crop on the left shows why simply choosing a vertical ratio was insufficient.
4. Duplicate the canvas to make the end frame
Save the start composition, then duplicate the document or page.
In the duplicate, select only the sharp picture layer. Change its width from 820 to 861 pixels, keeping proportions linked, and centre it again. That is a 5% enlargement. Its height becomes about 484 pixels, with approximately 20 pixels remaining on each side.
The plate and cup still fit because the entire picture layer remains inside the canvas. Leave the blurred background, cream overlay, lighting, and food artwork unchanged.
Export the start and end as two separate, complete 900×1600 PNGs. Do not upload the side-by-side teaching comparison below as one input.

This prepares a slight push-in on the rectangular picture panel. It does not create a new three-dimensional camera view of the table.
5. Use both inputs with a matching motion request
The HeyDream free image-to-video tool is one option for the generation step. Its current image workflow requires a start image and an end image, a motion or camera description, and an aspect ratio.
Supply the two complete portrait exports and choose 9:16. A prompt aligned with these prepared states is:
Make a gentle, subtle push-in by slightly enlarging the sharp rectangular breakfast picture toward the supplied end frame. Keep it centred and keep the whole plate, toast, egg, cup handle, and saucer visible. Hold the portrait background fixed. Preserve the food, colours, and lighting. Add no steam, moving ingredients, new objects, lettering, or camera orbit.
The requested change is the picture layer's enlargement. Asking for an orbit, food movement, or a full-screen zoom into the egg would describe a different end state.
6. Check the actual preview before downloading
The vendor describes preview and download; these illustrations are input plans, not proof of what a generated clip will do.
If you generate a candidate, inspect the beginning, middle, and end. Check the plate rim, cup handle, saucer, and the edge of the sharp picture. Watch for the inset becoming full-screen, changing food, drifting borders, or a background that starts moving independently.
Keep exact café names, prices, and menu claims out of the generated picture. Add any necessary wording later in a separate editor, using accurate information and checking the final placement.
If generation changes important food details, retain the prepared still layout or use an ordinary editor's scale animation. The portrait canvas already solves the cropping problem; generated motion is an optional next step.



Responses (0)